Customizing your storefront
This guide walks through making your OrderLyne storefront actually look like your brand — picking a theme, setting your colors, uploading logos, and getting your home page into shape. Most of what matters can be done in 30 minutes.
A note before you start: storefront customization is split across two places in OrderLyne, and knowing the split saves time.
- Themes — the visual side. Colors, sections, hero images, logos, header style, footer style. This lives in Themes in the dashboard sidebar.
- Online Store settings — the store-level side. Default logo, custom domain, payment methods, policies, contact details. This lives in Online Store in the dashboard sidebar.
You’ll spend most of your time in Themes. We’ll cover that first.
Pick a theme
Section titled “Pick a theme”OrderLyne ships with 17 niche-tuned themes. Each is built for a specific kind of brand — bridal jewellery looks different from a streetwear drop, and the themes reflect that.
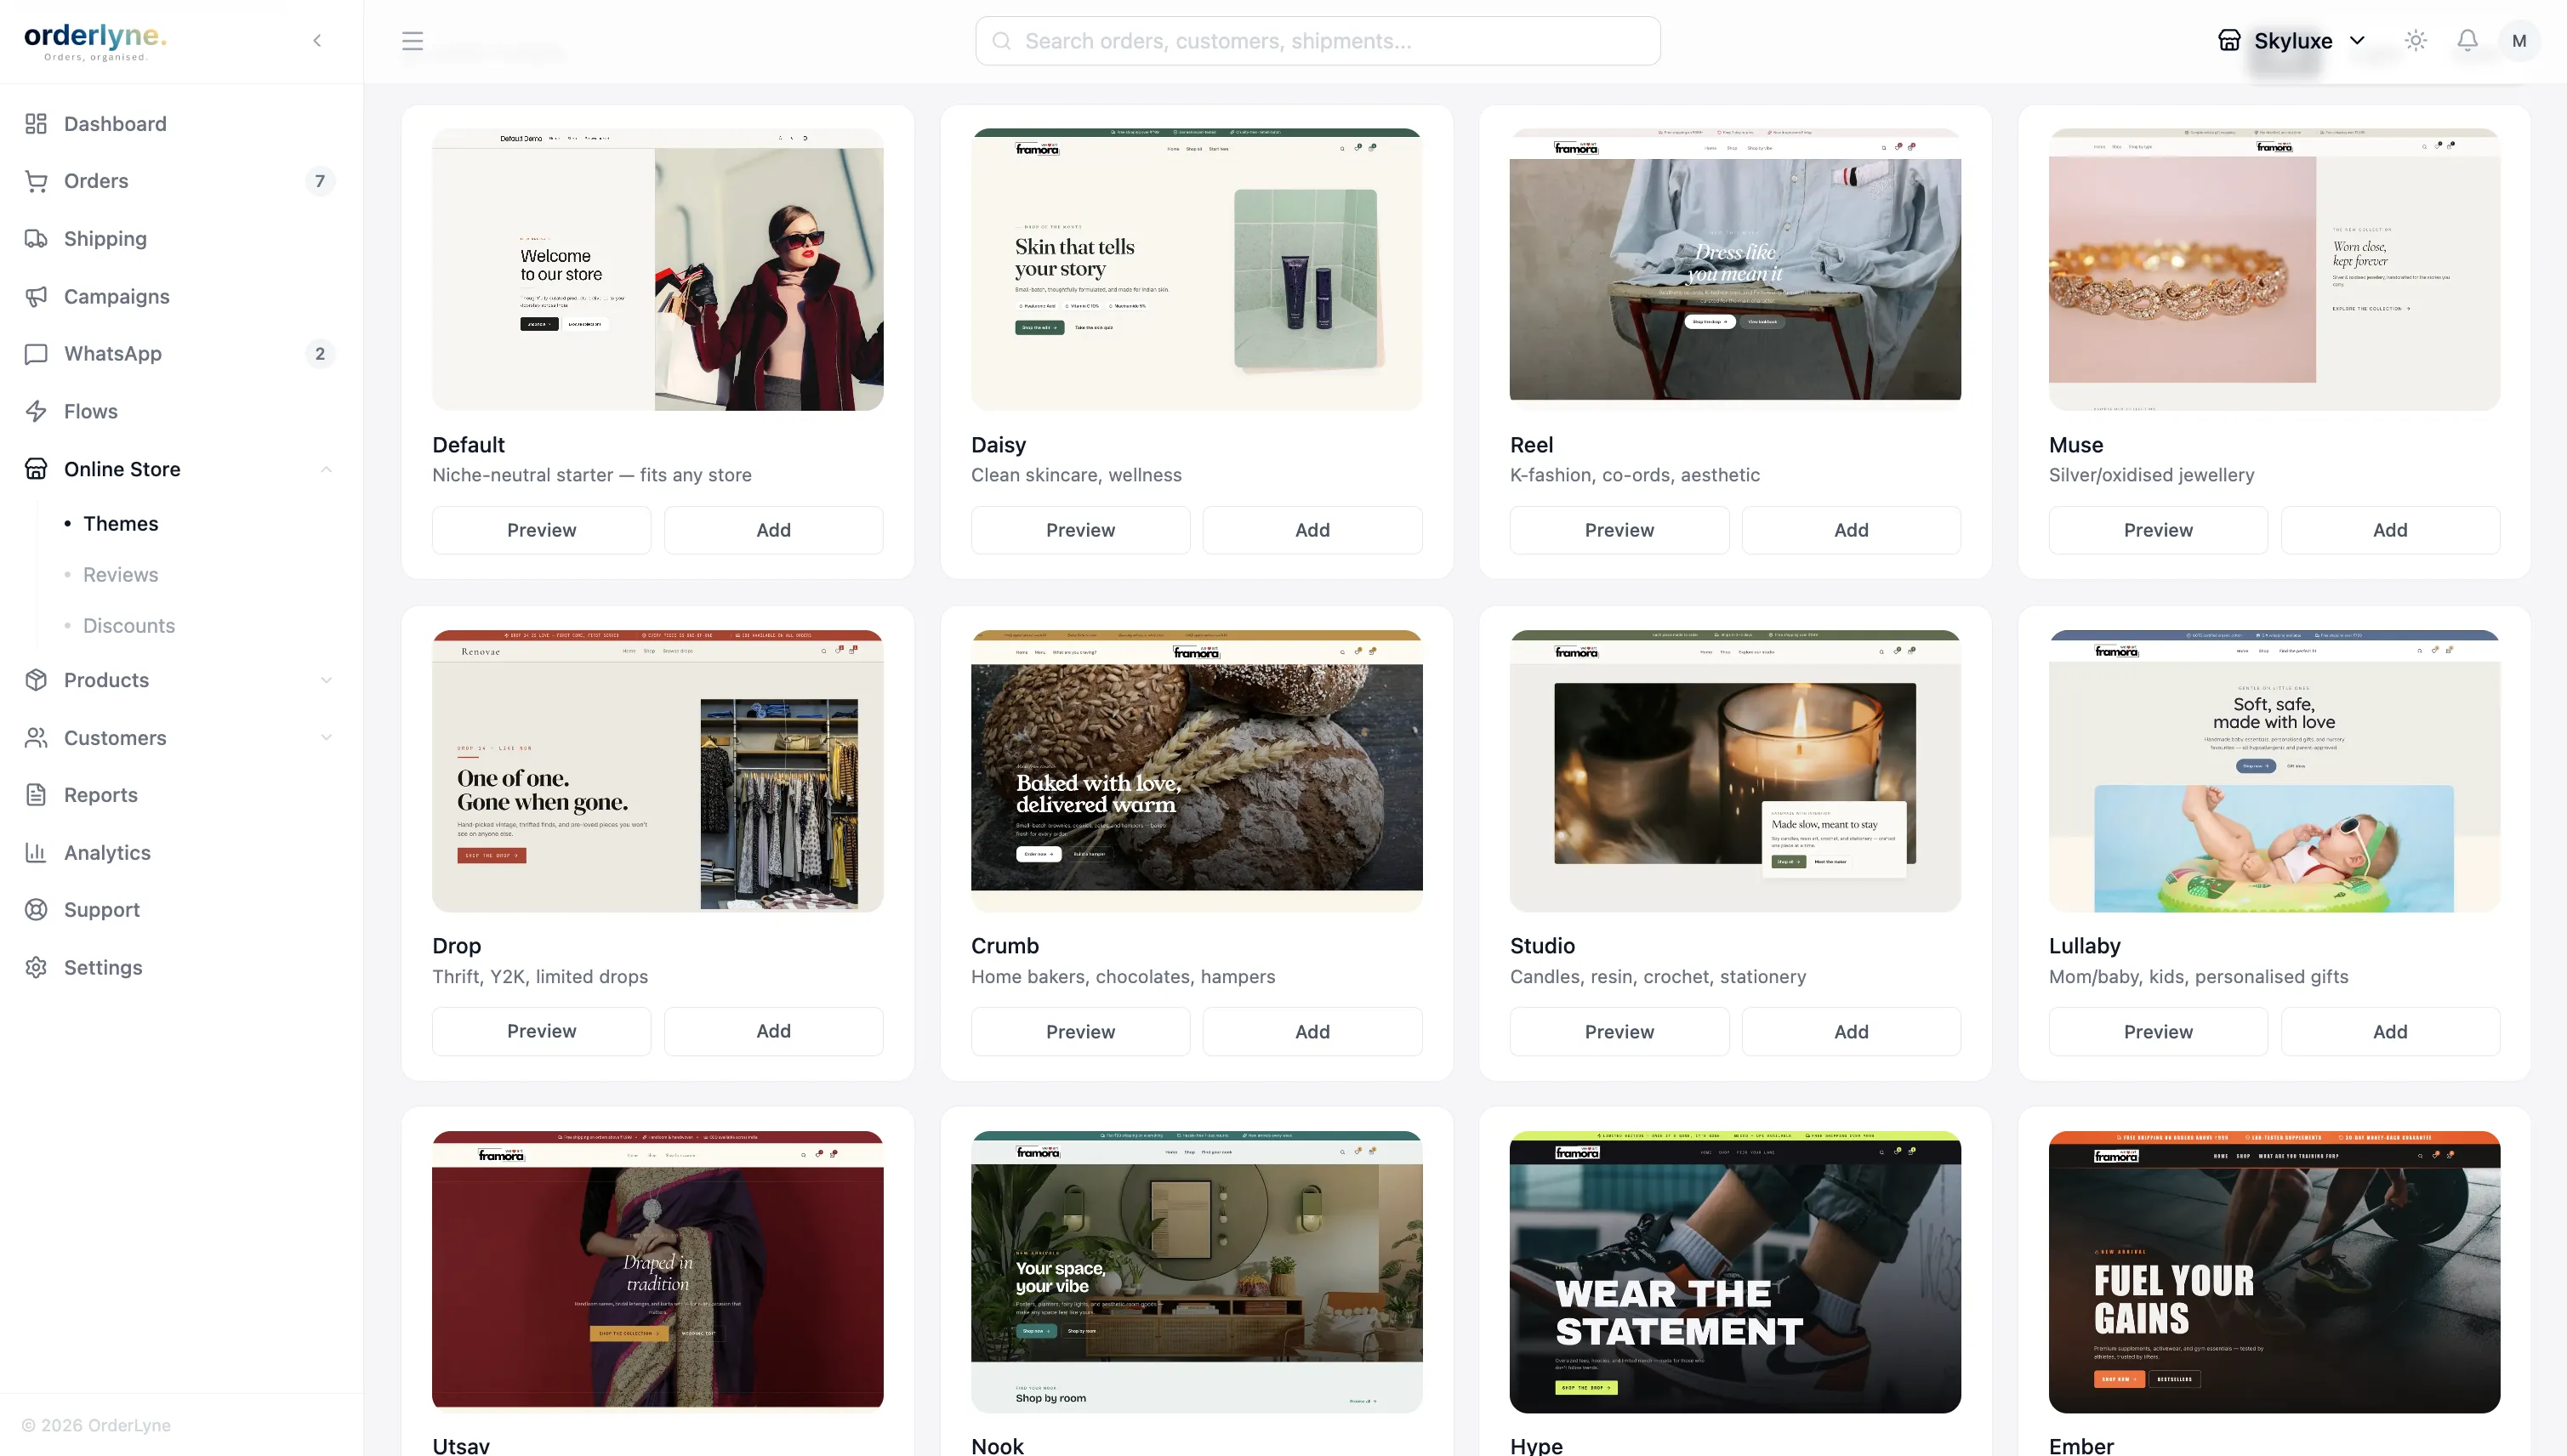
Browse the gallery and pick one that matches the feel you want, not the exact colors — those are easy to change later. What’s harder to change is the structural style of the theme: how product images are presented, how the hero section behaves, whether the brand voice feels editorial or punchy.
A few quick suggestions:
- Skincare, wellness, ayurveda — themes like Daisy or Lullaby (clean, soft, image-led)
- Streetwear, drops, Y2K, K-fashion — themes like Hype, Drop, or Phantom (bold, dense, energetic)
- Bridal, jewellery, premium beauty — themes like Velvet, Muse, or Utsav (refined, editorial, warm)
- Bakers, gourmet food, candles, crafts — themes like Crumb, Nook, or Studio (cozy, hand-made)
You can change the theme any time. Don’t overthink the first pick.
Three active themes at a time
Section titled “Three active themes at a time”OrderLyne lets you have three themes active at once — meaning you can customize three themes in parallel, even though only one is published to your storefront at any given time.
This is genuinely useful for a few situations:
- Festive seasons — prep a Diwali or Karwa Chauth theme in draft for two weeks, publish on launch day, switch back to your everyday theme after the festive period.
- Sale events — keep a “sale mode” theme ready with bigger discount banners and a tighter product grid; switch to it for a 48-hour sale.
- Trying out a redesign — work on a new look for two weeks without disturbing your live storefront.
Each active theme has its own draft and published state, and its own logos. Customize freely on any of them — only the one you’ve explicitly published will affect customers.
The theme editor
Section titled “The theme editor”Click any active theme to open the editor.
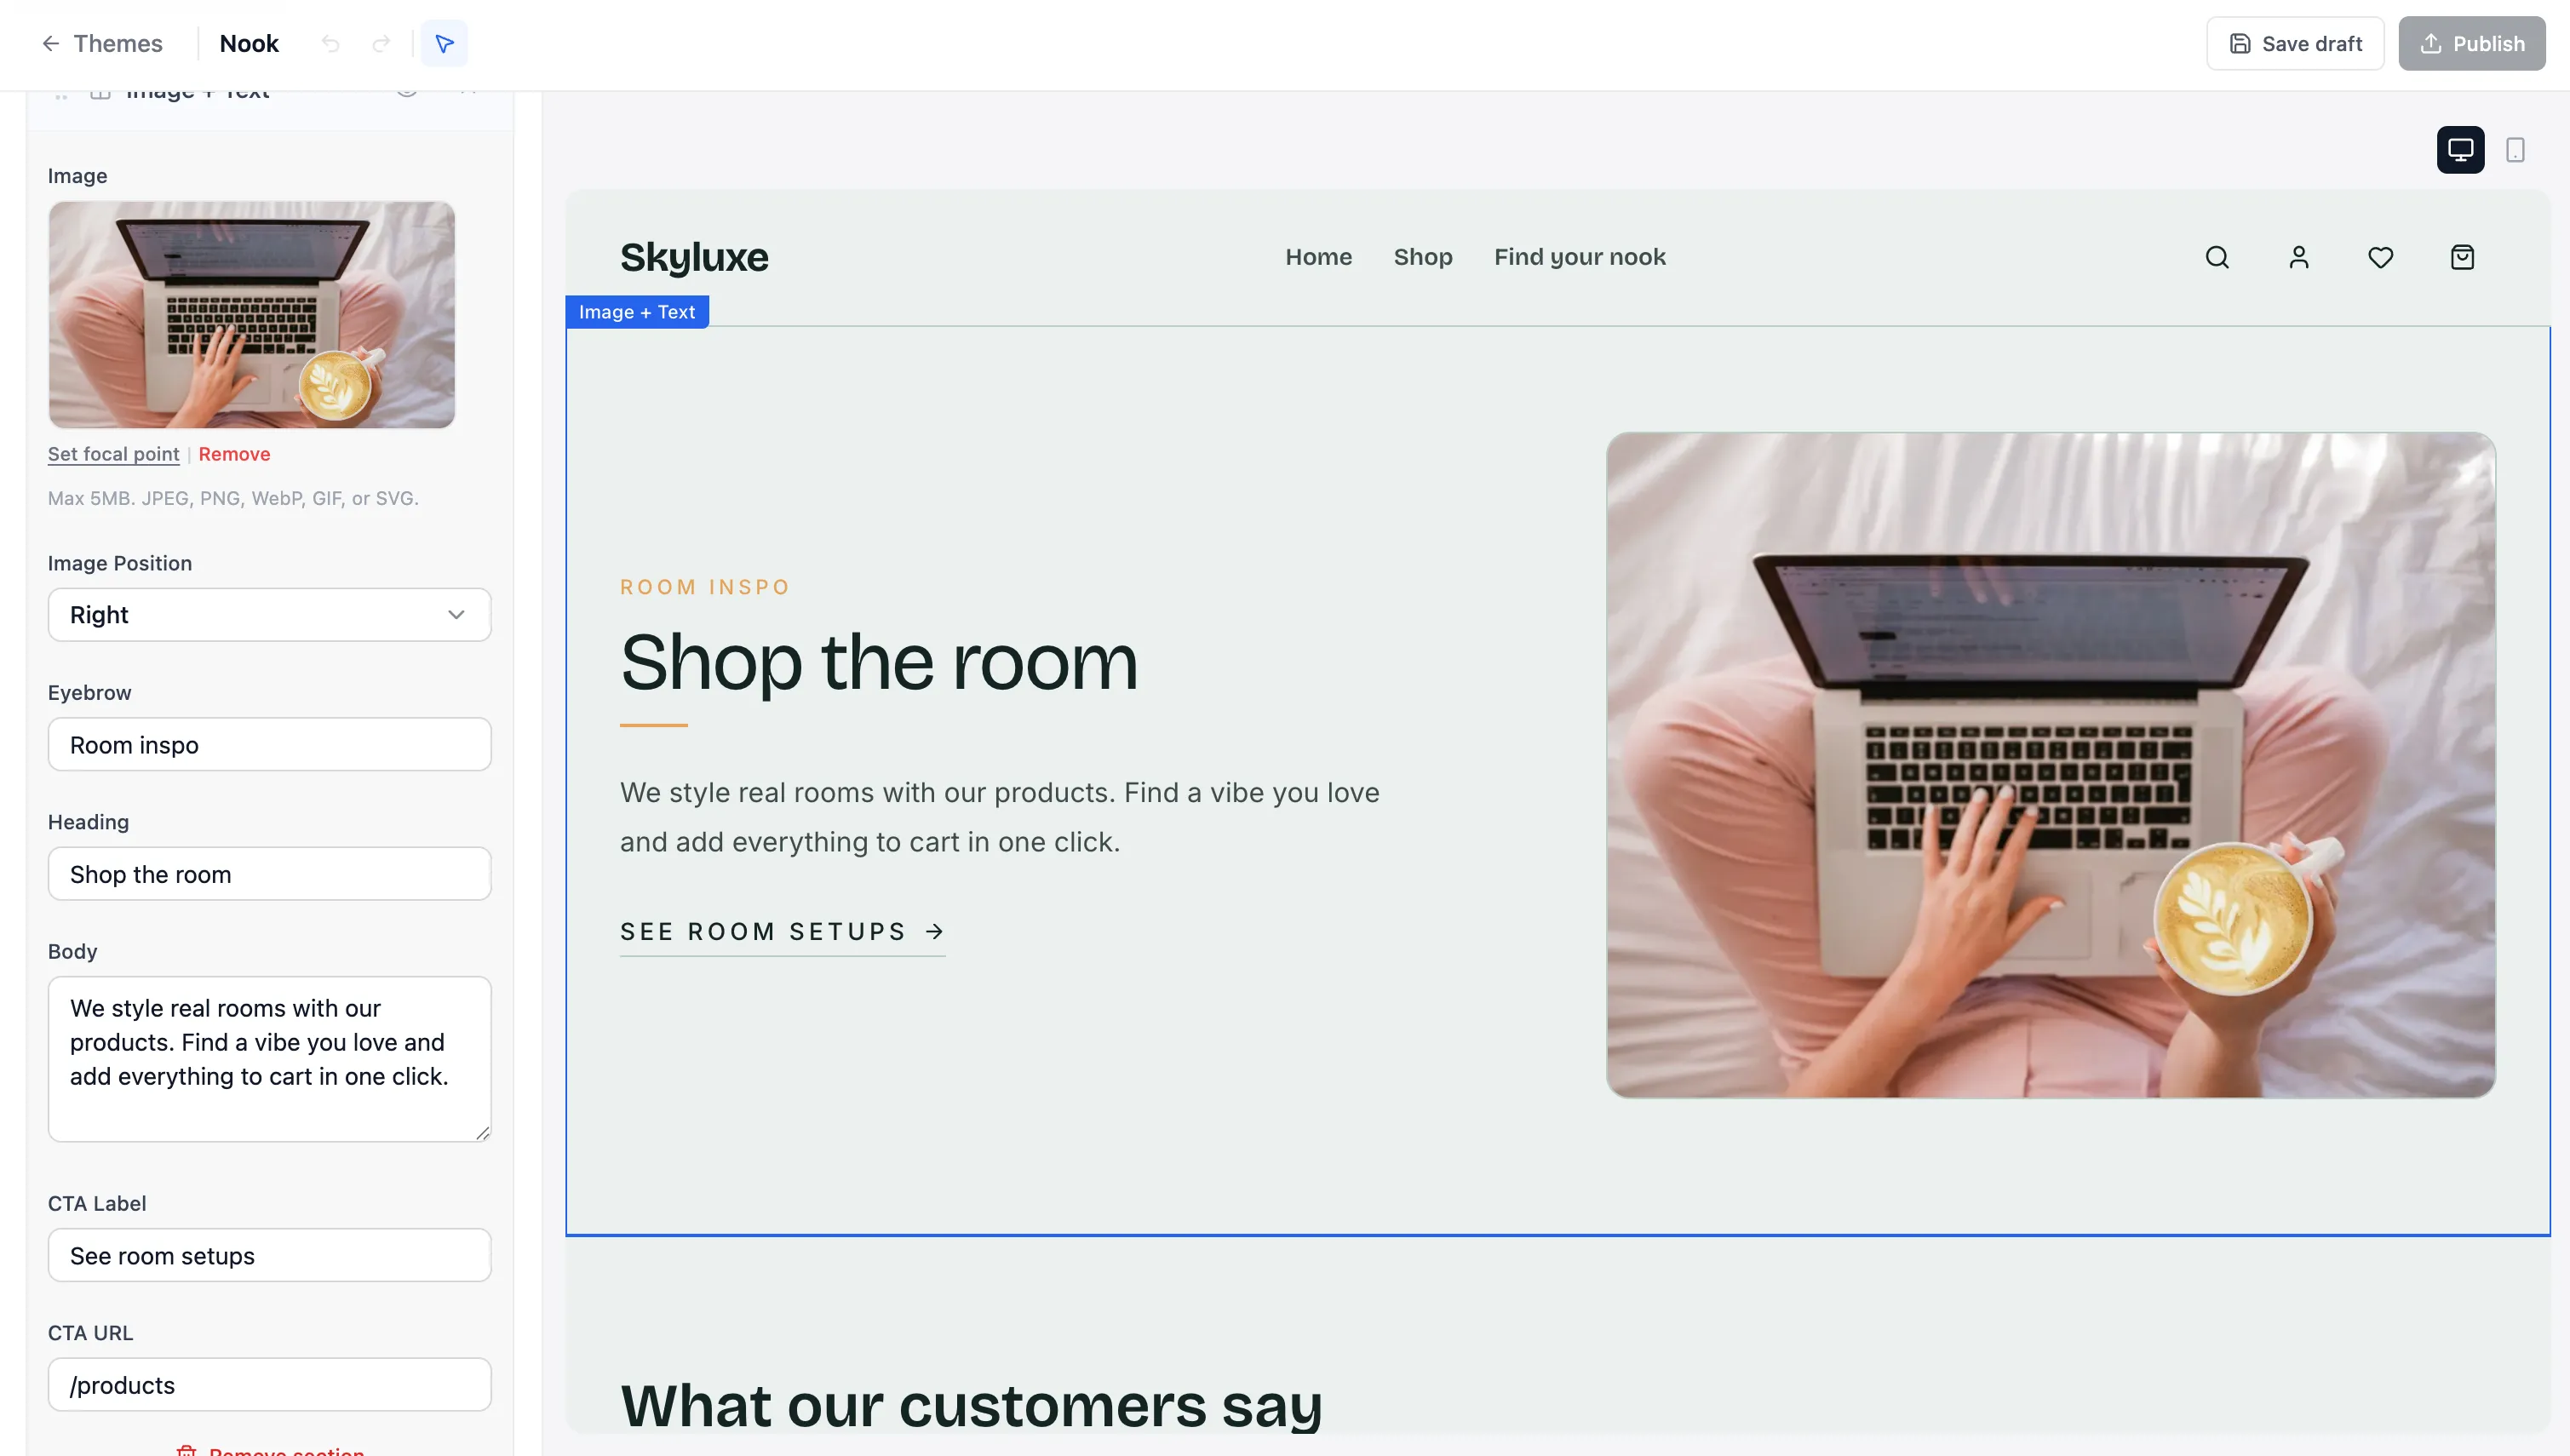
The editor has three main areas:
- Left panel — settings: brand colors, sections, header, footer, logos, page-specific settings
- Right panel — live preview of your storefront with the changes you’re making
- Top bar — desktop/mobile preview toggle, and the Publish button
Changes stay in draft until you click Publish. You can edit safely without affecting what customers see.
The things worth setting first
Section titled “The things worth setting first”Resist the urge to tweak every section before you’ve handled the high-impact basics. These take maybe 20 minutes and make the biggest visual difference:
1. Brand colors
Section titled “1. Brand colors”Open Theme settings → Colors. Set your primary color (used for buttons, links, accents) and your secondary color (used for backgrounds and contrasts). If you don’t have brand colors picked out, start with one strong color and pure white — restraint reads more premium than five colors fighting each other.
2. Fonts
Section titled “2. Fonts”Each theme ships with carefully chosen fonts paired to its visual style — Daisy’s serifs versus Hype’s bold sans-serifs aren’t accidental. Custom font selection isn’t available today, but it’s on the roadmap.
If a theme’s font feels close-but-not-quite, try a different theme with similar structure but different typography before settling. The font choices across the 17 themes cover most niche-appropriate styles.
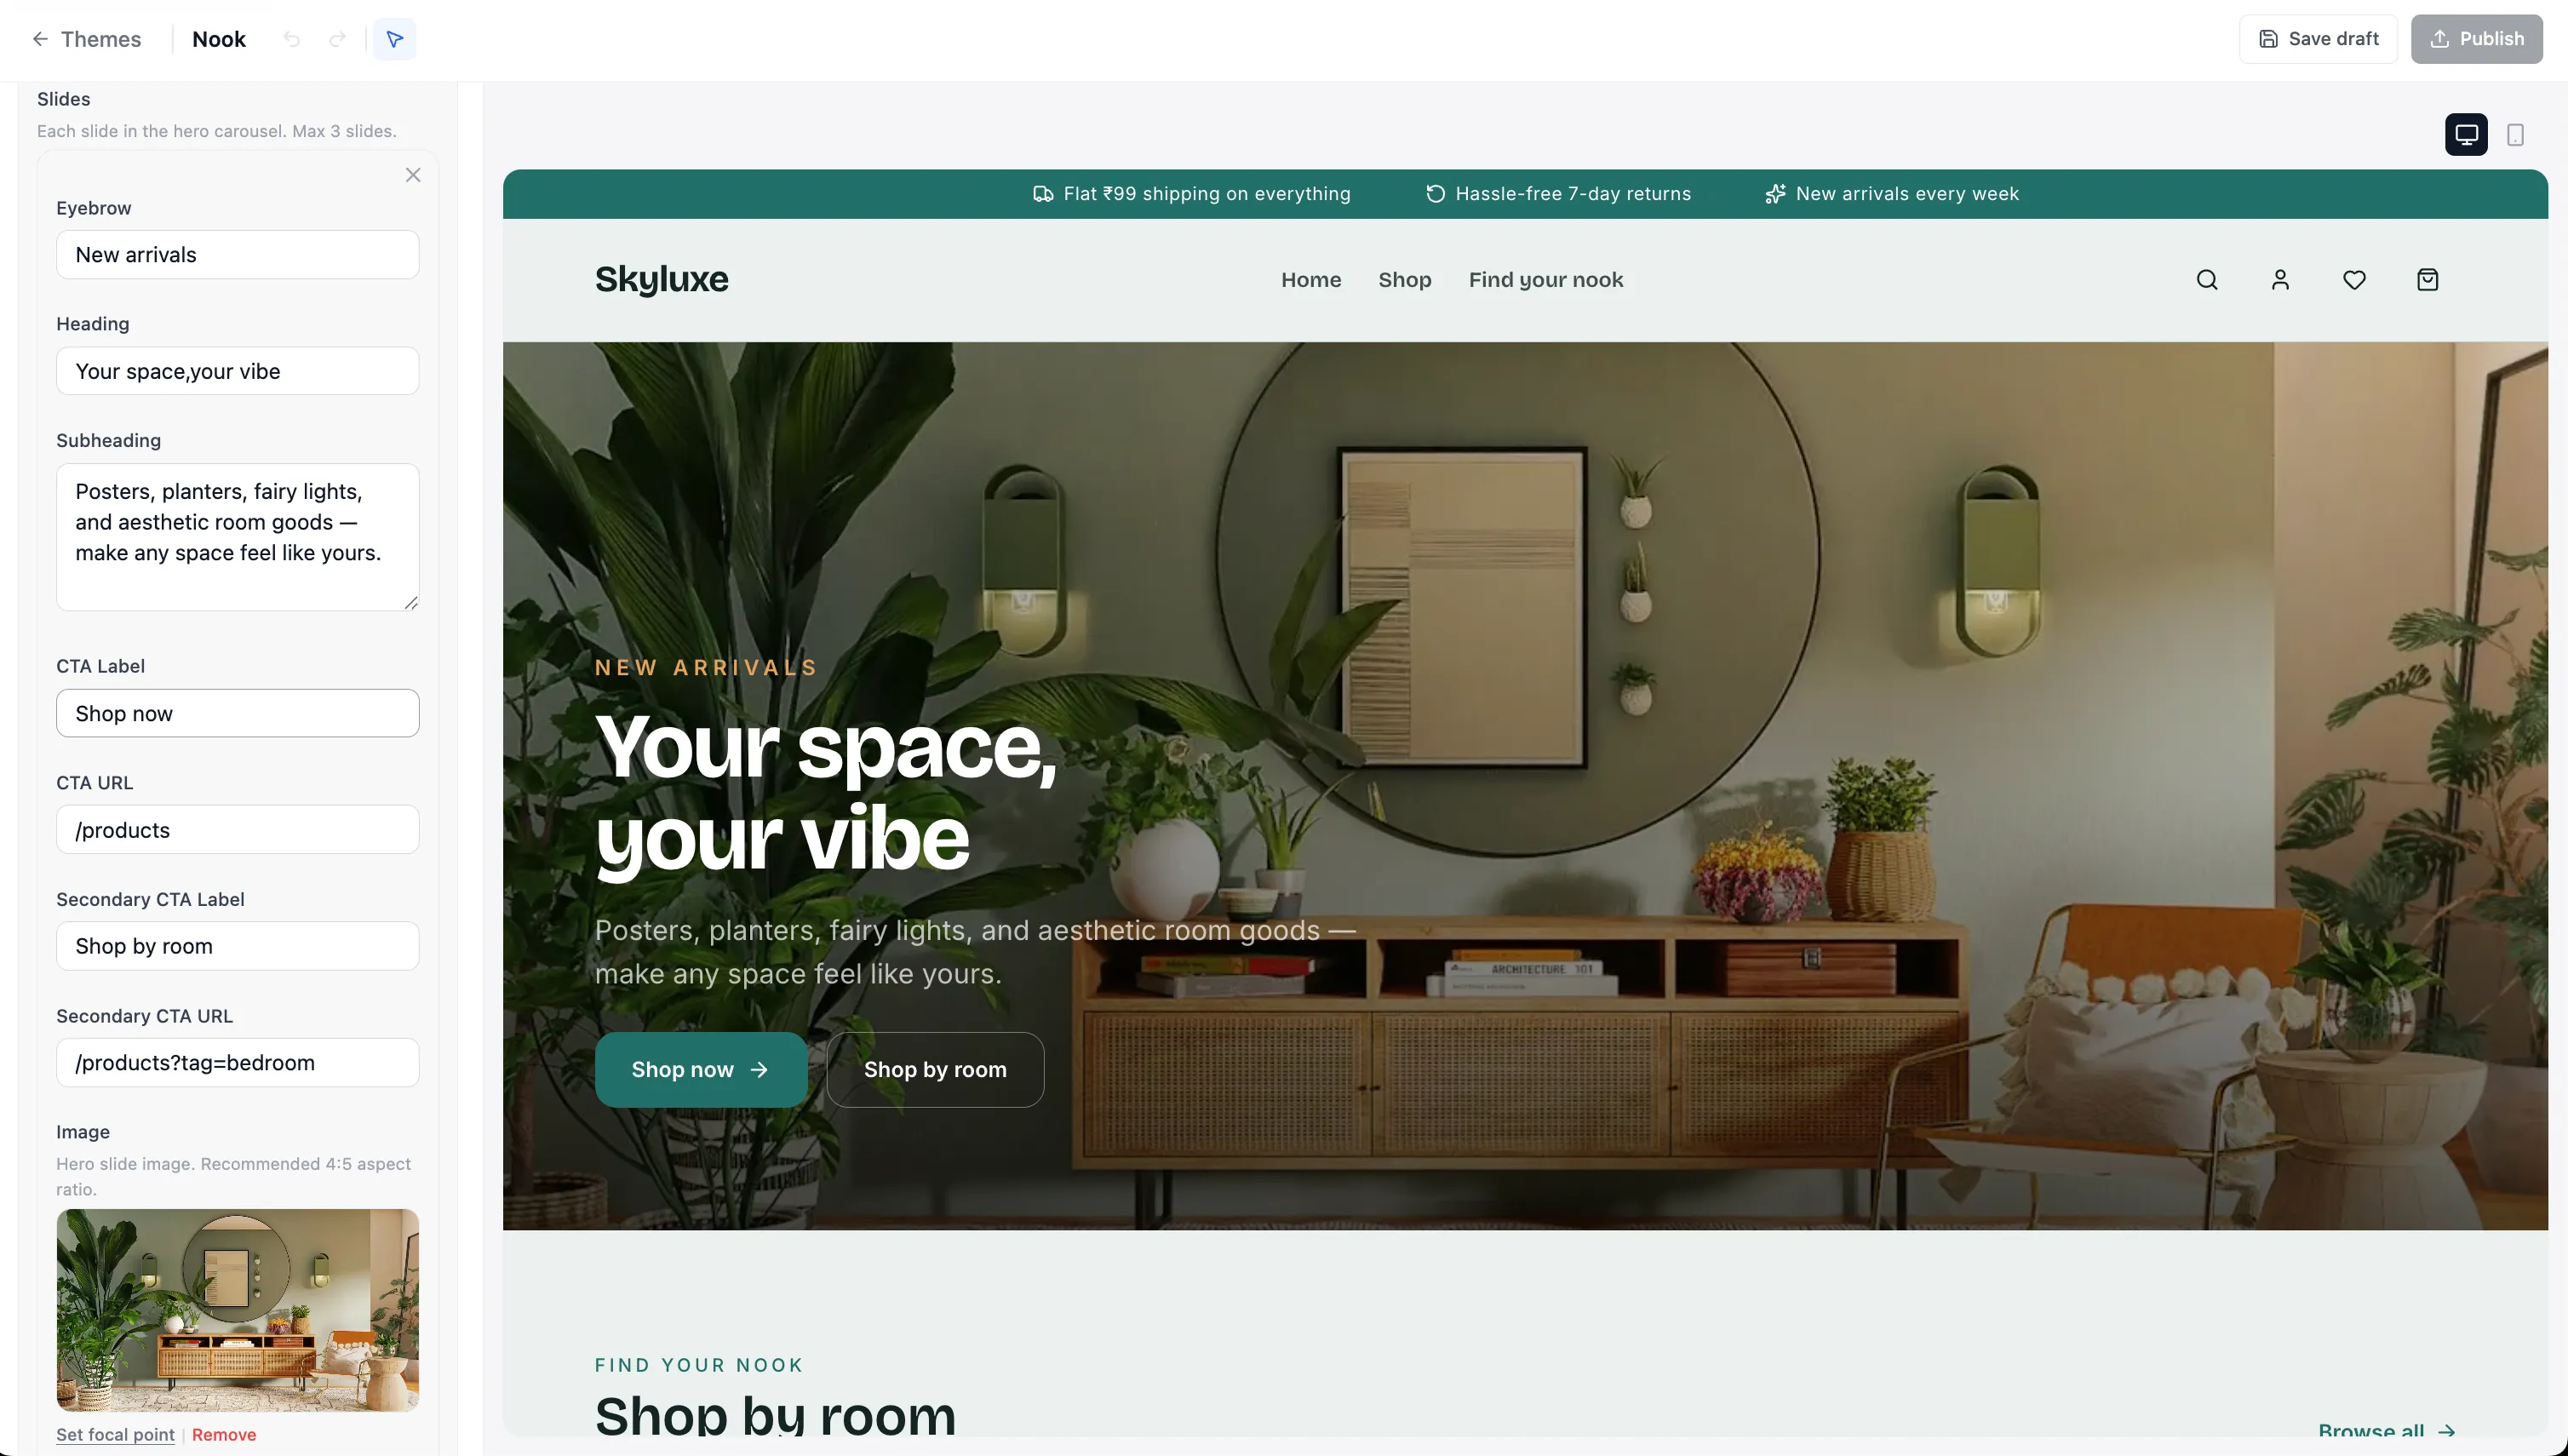
3. Hero image
Section titled “3. Hero image”Open the Sections panel and find the Hero section at the top of your home page. Replace the default image with a high-quality photo of your best-selling product, your brand lifestyle shot, or your packaging. This is the first thing a customer sees — make it count.
4. Logos — header and footer
Section titled “4. Logos — header and footer”Each theme has its own logo settings, with separate logos for the header and footer. Open the theme editor and find the Logo settings (usually under Header and Footer sections respectively).
A few practical notes:
- Header logo — typically your full horizontal brand mark. Upload a transparent PNG for best results across light and dark backgrounds.
- Footer logo — can be the same as your header, or a simplified version (just your icon, or a stacked variant). Some brands also use a single-color version of their logo here.
- Default logo — if you don’t upload a per-theme logo, the theme falls back to the default logo set in Online Store → Settings. Set the default once, override per theme when you need to.
This per-theme logo support is useful for the three-active-themes feature — your festive theme can have a Diwali variant of your logo while your everyday theme keeps the regular one.
5. Footer
Section titled “5. Footer”The Footer section in the editor handles your social links and footer menu items. The actual store policies (Privacy, Terms, Shipping, Returns) are configured in Online Store → Policies and automatically appear in the footer once they’re set.
Sections — a quick orientation
Section titled “Sections — a quick orientation”OrderLyne themes are built from sections: hero, product grids, testimonials, image+text blocks, newsletter signup, and so on. You can:
- Reorder sections by dragging them in the left panel
- Toggle sections on or off without deleting them
- Edit the content of each section (text, images, product picks)
- Remove sections you don’t need
The home page typically has 5-8 sections. Don’t add more for the sake of it — a tighter home page converts better than a longer one.
Other store settings
Section titled “Other store settings”A few things live in Online Store rather than the theme editor:
- Default logo — Online Store → Settings. Used as the fallback if a theme doesn’t have its own logo set. Upload a square or wide-format PNG with a transparent background.
- Custom domain — Online Store → Domains. Point your own domain (yourbrand.com) to the store. The OrderLyne subdomain stays as a backup.
- Payment methods — Online Store → Payment Methods. Connect Razorpay or Cashfree, enable Cash on Delivery.
- Store policies — Online Store → Policies. Set up Privacy, Terms, Refund, Shipping policies. These appear in your footer automatically.
- Contact information — Online Store → Contact. Email, phone, address shown on the Contact page and in receipts.
Each of these has its own guide — check the Online Store settings section in the sidebar.
Things to focus on
Section titled “Things to focus on”What matters in the first week of running your storefront:
- Theme picked, colors set, logos uploaded (header and footer)
- One real product photo in the hero
- Real products replacing the demo data
- Footer policies configured (in Online Store → Policies)
Everything beyond this — picking the perfect hero crop, swapping out the testimonial section, fine-tuning your collection grid — is iteration. Do it after you’ve taken a real test order, posted to Instagram, and seen what customers actually click.
A practical note: OrderLyne’s themes are built to look polished out of the box. Most of the heavy design work has already been done by the theme designers. Your job is to drop in your brand assets, not to redesign the theme. Trust the theme.
Publish
Section titled “Publish”When your theme looks the way you want it to, click Publish in the top right of the theme editor. Changes go live to your storefront within a few seconds.
If you change your mind, you can keep working on the same theme (the published version stays live until you publish again), or switch to another active theme by publishing it instead.
What’s next
Section titled “What’s next”Now that your storefront looks like your brand:
- Add your products — if you haven’t already, Adding your first product covers the form, variants, and bulk upload.
- Connect WhatsApp — WhatsApp automations overview walks through turning on order confirmations and shipping updates.
- Set up your domain — once your store is polished, Adding a custom domain walks through pointing yourbrand.com at OrderLyne.
- Share your store on Instagram — the practical playbook for getting your storefront URL into a working bio link.
Stuck on a specific step? Reach out at hello@orderlyne.app.